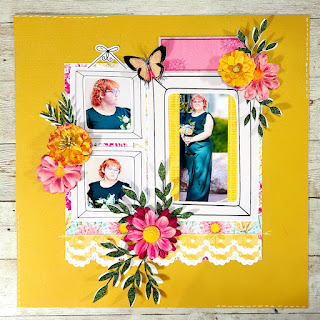
Spring Flowers Layout
Hi, scrapbookers! I'm so sorry that I forgot to share this post with you on National Scrapbook Day. But better late than never, right? Here is a layout that I created to celebrate the arrival of spring. I also included a few tips for creating your own springtime scrapbook layouts, as well as a self-challenge that you can use to get some layouts done.
I also created a process video that shows you how I created this layout. You can watch the video below.
National Scrapbook Day is a day to celebrate the art of scrapbooking. It is a time to get creative and share your memories with others. This year, why not create a scrapbook layout that celebrates the arrival of spring?
This layout is perfect for capturing all of the beautiful springtime colors and flowers. It includes a page map that shows the location of the photos, as well as a journaling space to write about your memories.
To create this layout, you will need the following supplies:
- Photos - cut to the size of the openings of the frames.
- Mine are set to 2.25" x 2.25" for both small pictures 3.25" x 4.75".
- Mustard yellow cardstock 12 x 12 (or your color choice)
- White Cardstock
- Mulberry flowers
- Provided page map template grab yours here.
- May Flowers Digital Scrapbook Kit
- Grab here from Creative Fabrica I used my cricut with print then cut to make mine. But you can just print and fussy cut if you would like or use any other machine.
- Paper or cardstock to print your kit
- I use matte presentation paper found on Amazon.
- white gel pen for hand-drawn stitching.
- Usuals, tape, glue, paper cutter, scissors
- Optional pan pastels or inks to color flowers
Once you have gathered your supplies, follow these steps to create your layout, and don't forget the video below to help you see how it was all put together.
- Use the solid yellow 12" x 12" or color of your choice cardstock as your base
- Cut all your kit pieces out that you want to use on the cricut or other cutting machine or start fussy cutting.
- Print your patterned paper from the kit. Cut to 8"x8"
- Adhere 8x8 to the center of the 12"x12" cardstock.
- Layer on all the flowers and ephemera according to the page map and adhere.
- Note I cut additional shadow pieces from the white cardstock of all my print to cut pieces and used them to make a shadow layer under all the leaves and the butterfly. I also cut an additional butterfly to make a more 3d effect. For the scallop, I used patterned paper from the kit as a pattern fill-in on print then cut that was uploaded to design space. Two pieces I cut from plain white cardstock.
- Write journaling about your memories in the spaces provided.
Here are some tips for creating a beautiful scrapbook layout:
- Use a variety of colors and patterns to create a visually appealing layout.
- Add stickers, embellishments, and other decorative elements to make your layout stand out.
- Don't be afraid to experiment with different techniques and styles.
- Most importantly, have fun and be creative!
Here are some additional tips for creating a scrapbook layout:
- Use photos that capture the beauty of springtime.
- Write journaling about your favorite springtime memories.
- Share your layout with friends and family!


Comments