
Barbie Birthday Party Recipes and Tutorial Video Links
08/16/26-Updated Blog notes
So this is an original post from when my daughter was 7, she is now 16.But I updated the blog with new note on some pretty cool alternatives to all the ideas I had back then, and some new projects I created. Check them out. All links are updated as well.All updates are in pink of course lol.
So my kids keep growing and no matter how much I tell them to stop it just keeps happening. So my beautiful daughter just turned 7, still can't believe it. Well we had her birthday party at the park and decided it would be Barbie themed. Mostly because last year my store (work at Michaels) had a great sale on a ton of Barbie stuff so I called up my daughter and said well how about Barbie for your next Birthday. And if you have followed my blog for a bit...and thank you so much for those of you that do...you know I plan my parties at least 6 months in advance. Does not mean I actually get started on them that far but I do plan them...lol.
So anywho...here is what I came up with.
 Well pretty much all the decorations were made by hand with the help of the Silhouette Cameo and Supplies from Michaels.
Here is a great Barbie like font that can be used for everything.I now use the Cricut for all my cuts.And for any other Barbieish graphics you can legally use grab them from Creative Fabrica.I have found the best prompt for finding these is "pink doll".
 Love using the Cameo to create all the cuts I needed.
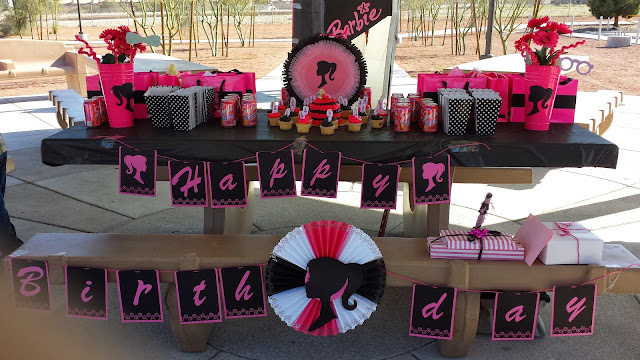
I made this rosette using an EK Success Boarder Punch
And created a Barbie Silhouette that using throughout the party.
The banner was made easily by just layering two colors of card-stock and used the boarder punch on the bottom of the black layer only.
And corner rounded the top edges of both pieces of card-stock.
The letters were cut on the Cameo.
Love using the Cameo to create all the cuts I needed.
I made this rosette using an EK Success Boarder Punch
And created a Barbie Silhouette that using throughout the party.
The banner was made easily by just layering two colors of card-stock and used the boarder punch on the bottom of the black layer only.
And corner rounded the top edges of both pieces of card-stock.
The letters were cut on the Cameo.
 The bags behind this long cute vase of flowers also have a little Barbie Silhouette on the fronts. Grab similar bags here.Bags were made by adding a wide black ribbon to the fronts and adding the barbie silhouette in the centers. But I think I would change it up a bit now and add the child's name in a Barbie font instead.Like this
The bags were a fantastic buy from Goodwill years ago.
I used them during my daughters Hello Kitty Party.
Here is a great alternative that is both safe and super cute.
 Candy Covered Popcorn
Always a hit at parties.
Candy Covered Popcorn
Always a hit at parties.
Get pink Boxes here or Black stripe here.
 Black and pink cupcakes (really they are pink)
Ordered from a chain supermarket.
Frosting was horrible.
Next time I make my own.
OK so here I cheated a little and used store bought cupcake toppers.
Black and pink cupcakes (really they are pink)
Ordered from a chain supermarket.
Frosting was horrible.
Next time I make my own.
OK so here I cheated a little and used store bought cupcake toppers.
Here are a huge variety of Barbie Cupcake toppers. Or you can grab some from my shop as well. If you want to make your own grab these files from Creative Fabrica.
 My favorite...
A Barbie Pinata I made myself.
So proud of myself.
I got the directions on a video off YouTube.
But I change how I did a few bits.
My favorite...
A Barbie Pinata I made myself.
So proud of myself.
I got the directions on a video off YouTube.
But I change how I did a few bits.
 The Birthday girl.
Who I should have taken a picture of before she started playing.
Dress was purchased on GroopDealz.com
Even came with a cute hair clip.
New Dress alternative from the new barbie movie.
The Birthday girl.
Who I should have taken a picture of before she started playing.
Dress was purchased on GroopDealz.com
Even came with a cute hair clip.
New Dress alternative from the new barbie movie.
08/16/26-Updated Blog notes
So this is an original post from when my daughter was 7, she is now 16.
But I updated the blog with new note on some pretty cool alternatives to all the ideas I had back then, and some new projects I created.
Check them out. All links are updated as well.
All updates are in pink of course lol.
So my kids keep growing and no matter how much I tell them to stop it just keeps happening. So my beautiful daughter just turned 7, still can't believe it. Well we had her birthday party at the park and decided it would be Barbie themed. Mostly because last year my store (work at Michaels) had a great sale on a ton of Barbie stuff so I called up my daughter and said well how about Barbie for your next Birthday. And if you have followed my blog for a bit...and thank you so much for those of you that do...you know I plan my parties at least 6 months in advance. Does not mean I actually get started on them that far but I do plan them...lol.


 And now for my other favorite decoration
It got a little banged up thanks to the wind that day.
My Barbie box.
Again I used the Cameo to cut the letters and silhouette you can just barely see on the bottom right.
I saw the idea on Pinterest of course.
OH MY GOSH. It took about 6 hours to make.
Mostly because I spray painted it and the cardboard just kept sucking up paint.
And because I used whatever left over cans were in the garage which happened to be cheap cans. I would definitely recommend using Krylon. Or brush painting it.
And now for my other favorite decoration
It got a little banged up thanks to the wind that day.
My Barbie box.
Again I used the Cameo to cut the letters and silhouette you can just barely see on the bottom right.
I saw the idea on Pinterest of course.
OH MY GOSH. It took about 6 hours to make.
Mostly because I spray painted it and the cardboard just kept sucking up paint.
And because I used whatever left over cans were in the garage which happened to be cheap cans. I would definitely recommend using Krylon. Or brush painting it.
So what did you think?
Let me know in the comments.
Would you like to see more tutorials?
Any questions?
Thanks for looking!

Comments