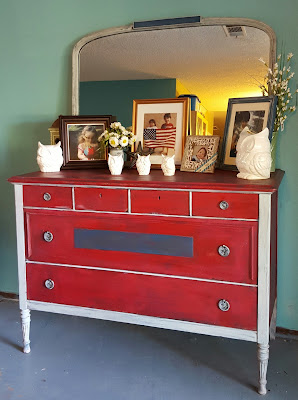
Chalky Finish Dresser Transformation
So I decided to enter in to the Americana Decor Chalky Finish Paint All About Second Chances Contest.
Just a little about why I finally decided to transform my dresser.
I picked it up from a yard sale back in 2006 a bit after my first child Simon was born. It was only $30, what a steal.
Well I work at Michaels and in came this new product to try out Americana Décor Chalky Finish Paint. I was in love. I started painting every Mason jar, milk jar, frame and more in the store for samples and at home.
And earlier this year I decided to finally love my living room and repaint the walls and every piece of furniture in it. I finally decided it was alright to love color. So I did and embraced so many wonderful colors.
I had always wanted to paint my dresser red because my kitchen has a coca cola theme to it. I was just always a little scared to do it. Well because it's red...But then I saw this paint, this new Americana Décor “Chalky” paint. It was perfect. Not too bright a red but a serious red.
Then my son, now 9 years old took an interest in the project, no I did not get any help from him except for his opinion he was the one that picked out the blue and white and told me what looked good. I loved the times he came by and said “Looks really good mom”. So it kept me going even when I was not sure I wanted to. And now we all love the Dresser now re-purposed into Art Supply drawers.
Step by Step
Process of completing my 100+ Year old Dresser Transformation
First step the cleaning process. Clean all surface with a
light cleaning solutions of Murphy’s Oil Soap. This helps the paint look better
and stick better.
I then removed a broken piece of trim from the bottom of a
drawer. But left the rest of the sides on.
Next I lightly sanded the entire dresser and cleaned it one
more time.
Now the real fun begins. I then painted the entire dresser
with Americana Chalky Finish paint in Vintage. This is so I had a base layer
and I used it as something of a light primer. I only lightly painted the
dresser so some of the dark brown and almost black colors could still come
through.
Next I painted the dresser with Americana Chalky Finish paint
in Romance. Leaving the legs and trim still in Vintage.
 |
| Looks good already right;) |
I then sanded and roughed up bits of the red paint to show
some of the under light grey paint and the original wood paint from the
dresser.
Next I taped off the center panel on one of the drawers to prep
for painting.
I mixed two of Americana Chalky Finish Paints to create a
custom Blue Color. About 3 parts Legacy & 1 part relic.
I used a simple
sponge brush to paint that mix on the center.
The wonderful part about Chalky Paint and dry Vegas weather,
is the paint dries so fast.
Next I sanded a bit of the blue paint to have the other
layers of paint show through.

Then I got a bristly brush and patted off as much of my
custom blue colored paint off as possible on to a paper towel and dry brushed
the entire dresser. Using a smaller chip brush for smaller areas.

I then again sanded off some of the paint on the entire
dresser and distress corners and edges with the sanding block.
I then used the Deep Brown Americana Décor Crème Wax to give
my dresser a more distressed look. Applying it where the distressed areas I
created earlier are.
 You can see the difference.
I next applied a clear wax to the entire dresser except for
the center Blue panel on the drawer so it could be used to write on with chalk.
This will help protect my furniture piece and give it a clean distressed look.
Last on the dresser I used Relic & Vintage to apply, with my finger
(best brush ever), to the drawer pulls to add dimension.
Next I started on the mirror.
This was a quick process, I cleaned it just like the dresser
and added tape to the mirror to protect it from getting paint on it.
Next I painted the entire frame of the mirror with Vintage.
And the little plaque area of the mirror with my Blue paint mix.
Once dry I used relic with a very dry brush method to apply
to the frame of the mirror.
I then added clear wax to the frame and again
leaving the blue area alone to write with chalk on it. All Done with the mirror. And after taking this picture realizing I hate my ceilings. Well guess that will be my next project.
Now the really fun part. Adding the accessories to the
dresser.
I even had enough paint left over to paint a frame and mason jar I
placed on the dresser.
And finally the transformation is complete.
Hope you like it. Leave a comment & don't forget to follow my blog.
And if you follow me on Instagram, Pinterest and Facebook, you get sneak peeks of projects I am working on all the time.


Comments